 to display the Options window, click Firm
Setup from the navigation pane to display the Firm
Setup dialog.
Document Management > Auto-tagging documents
● Enable/disable the automated tagging of documents
● Auto-tagging documents on upload
● Opening a document after auto-tagging is enabled
Enabling the automated tagging of documents means that you are sharing with us anonymized information about your firm's use of Amicus Cloud. We use this data to help us design new features, and better understand how our users are taking advantage of the current features in Amicus Cloud.
Your firm can enable/disable the automated tagging of documents at any time, and there is no obligation to participate.
AbacusNext will not collect names, addresses or any other personally identifiable information and you can continue to work without interruption.
To enable/disable the automated tagging of documents:
1. Go to Options  to display the Options window, click Firm
Setup from the navigation pane to display the Firm
Setup dialog.

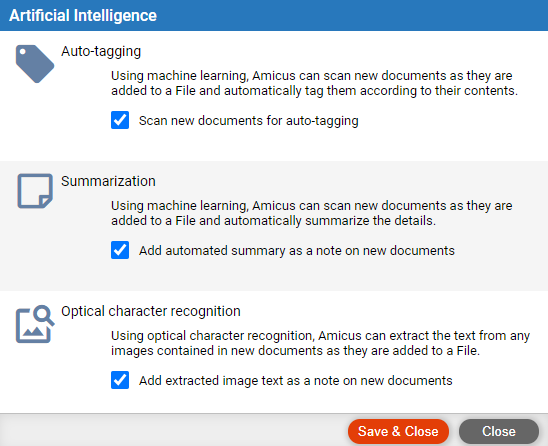
2. Select AI under the Documents
section to display the Artificial Intelligence window.

● Check the Scan new documents for auto-tagging checkbox to enable the automated tagging of documents and uncheck to disable auto-tagging of documents. It is enabled by default.
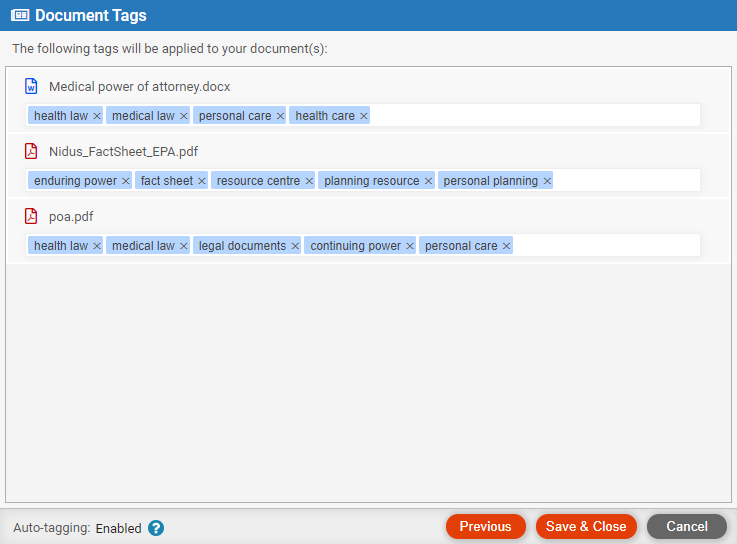
When a firm member chooses to upload single or multiple documents, they are sent 5 "suggested" document tags. They can accept or reject any of the tags. They can also add additional tags as necessary.
In the event that the machine learning team is unable to come up with tags, a Prompt message displays informing the firm member that "There are no suggested tags at this time."
Only the first 5 tags on any document are used by the machine learning team.
● Tags are applied automatically to a New Document.
● Tags are not applied to a New Version of an existing document.
To auto-tag documents on upload:
1. Click Add Document. The Add Document(s) dialog behaves like a wizard when the firm has enabled auto-tagging.

● The Next button is disabled until one or more documents has been added.
2. Click on the File icon to add a file. Click the Add icon to browse or drag and drop documents from the desktop.

● The Next button is enabled.
3. Click Next to display the Document Tags window and perform the tagging.

● A progress bar displays with the text "Tagging in progress."
4. Click Save & Close to add the tags to the document in Amicus Cloud.
● Click Previous to return to the Add Document dialog without saving the changes.
● Click the Help icon to learn about auto-tagging.

To open a document record:
1. Select Files in the main menu and open a file in the list.
2. Select Documents in the taskbar and open a document.

o When auto-tagging is enabled the Tag(s) field displays the various tags in a document record.
To apply tags:
1. Start entering text.
● A list of matching tags are presented after 3 characters.
2. To select
an existing tag, select one of the items from the list to tag it. .

3. Continue to enter text to refine the search or select an item from the list.
4. The text currently being entered displays as the first item in the list and is selected by default.
5. Simply click Enter to create the text as a tag and assign it to the document.
 |
Important: Duplicate tags are permitted in the system. If a tag already exists, you will only see a single item in the list below the field you are entering text. |
● In the tag field,
click Backspace to remove the tag to the left
of the cursor.
OR
● Hold your mouse
over a tag until an X appears.

o Click the X to remove the tag.
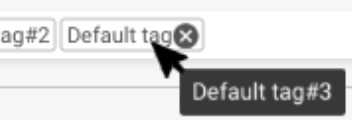
● When you hold your mouse over a tag, a tooltip displays showing the full tag name. This is helpful for documents with multiple tags.
o The tooltip always shows the complete tag name even if some text is not visible due to a constrained User interface (UI).
● More Artificial Intelligence
● Manage Dropbox or Box documents on a file
● Customize document assembly features
● Use the Microsoft Office Add-in for documents and document templates - (Tools)
Amicus Cloud (January 2023)
Copyright