 to display the Options - Firm Setup window, select
Billing from the left pane to display the Options
- Billing window, click Tax Rates from
the Taxes section.
to display the Options - Firm Setup window, select
Billing from the left pane to display the Options
- Billing window, click Tax Rates from
the Taxes section.
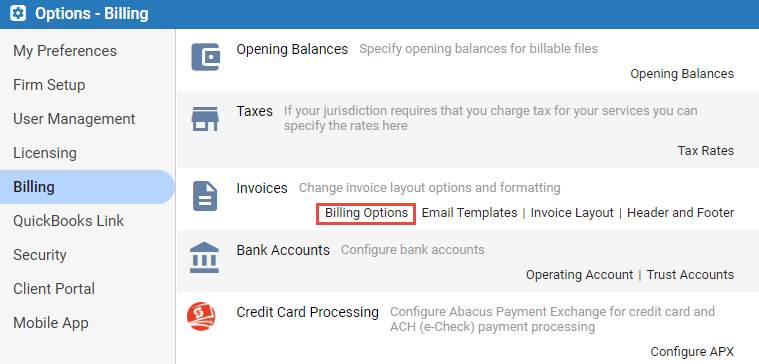
Billing > Customize billing features
Billing features may be customized to suit your needs, in particular taxes, invoices, and trust bank accounts.
Only the Amicus administrator, and users designated as billing users or supervisors, may access and change these options.
● Customize invoice layout details
● Customize invoice header and footer
● Designate the billing capabilities of firm members
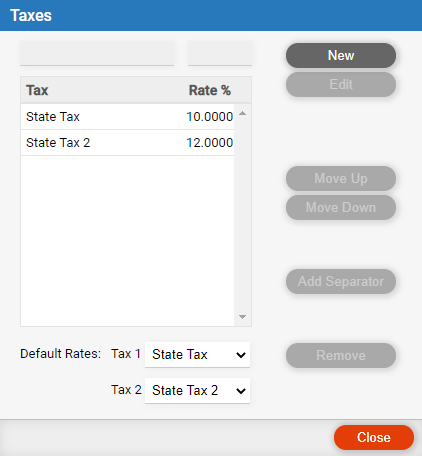
● Choose Options to display the Options - Firm Setup window, select
Billing from the left pane to display the Options
- Billing window, click Tax Rates from
the Taxes section.
● Change the list as desired: Add, remove, edit, or move tax rates in the list.
● Default
taxes: Select which tax(es) to apply by default in new files. Tax
settings can be changed in the Detail view of each file.
Upon billing a taxable file, taxes will be applied on fees (calculated
from the duration of time entries) and, if appropriate, on individual
expenses. For each expense type, you can configure whether tax(es) should
apply. In each individual expense on a taxable file, you can indicate
whether or not to apply tax.
● In the Options - Billing window, click
Billing Options from the Invoices section.
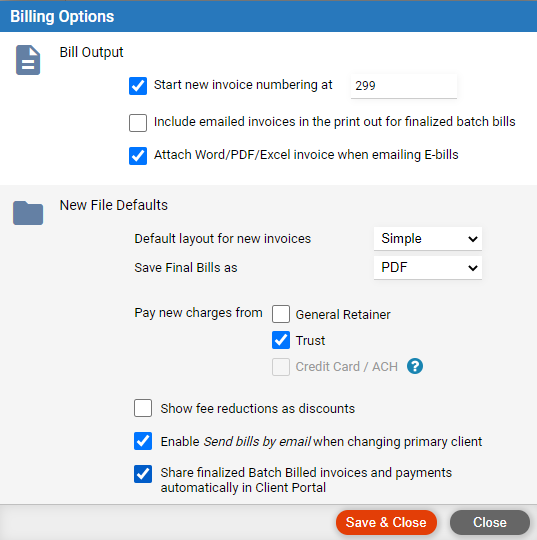
● Set the general options for new bills.
o Invoice numbering: Optionally, start numbering new invoices at a particular number, or restart numbering at a higher number.
o Printout: Choose whether to include emailed invoices in the printout for finalized batch bills.
o Format: Emailed bills can be attached as Word,
PDF or Excel in addition to the default E-Bill txt.
● For new files, set the default file-specific options for new bills.
o Default invoice layout: Simple or detailed. A detailed invoice includes details for all work.
o Save final bills as: When batch billing final bills, output invoices in PDF or Excel format. Note that if billing a client for multiple files together, the invoice for each file will be stored in a separate PDF or Excel computer file.
o Pay new charges from: Optionally, pay from general retainer and/or trust—this is relevant if billing by file rather than by client.
o Show fee reductions as discounts: Show as Courtesy Discount on invoices.
o Enable Send bills by email when changing primary client: Send invoices as an attachment on an email to the file's primary client. Note that if billing a client for multiple files together, the invoices for those files will be sent in a separate attachments on a single email.
o Share finalized Batch Billed invoices and payments automatically in Client Portal: All finalized batch billed invoices and payments are automatically shared in the Client Portal.
● In the Options - Billing window, click
Email Templates from the Invoices section.

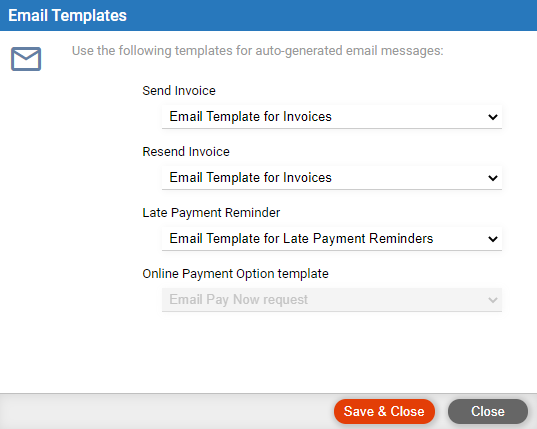
● Select from the pull-down menus of four distinct email templates used for:
o Sending Invoices
o Resending Invoices
o Sending a Late Payment Reminder
o Sending Pay Now links with Invoice email
● All four templates appear as document assembly templates that can be customized to your firm needs. This allows for much greater control over the content used for your automated email messages.
● In the Options - Billing window, click
Invoice Layout from the Invoices section.

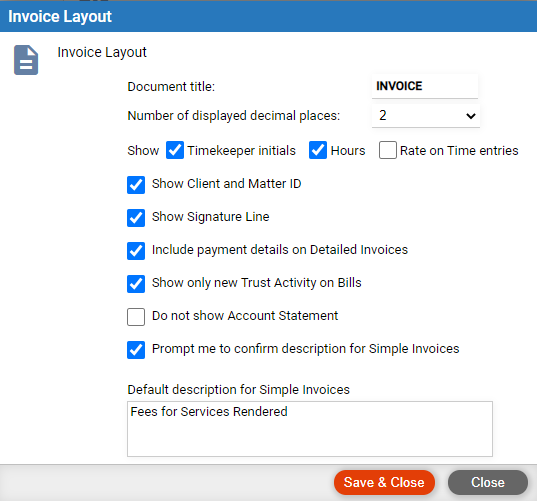
● Set the options for new invoices.
o Document title: Show this text at the top, e.g. "INVOICE" or "STATEMENT OF ACCOUNT".
o Timekeeper initials: Show initials next to each time entry in detailed invoices.
o Show Hours column: In the Fees section on detailed invoices, show hours for the individual time entries.
o Show Rate column: In the Fees section on detailed invoices, show hourly billing rate values for the individual time entries.
o Show client and/or matter ID: At the top right on invoices, show this file information (labelling it as the "File Number").
o Show signature line: At the bottom of invoices, show the name of the responsible lawyer on the file and provide a space for them to sign.
o Include payment details: In a Payments section on detailed invoices, list any new payments on the file since the last invoice. This includes new general retainer, but not trust applications or write-offs.
o Show only new trust activity: In the trust section of invoices, show only new trust activity since the previous invoice.
o Don't show Statement of Account: Hide the statement of account section on invoices.
o Prompt to confirm description: When I create a simple invoice, show a prompt that allows me to edit the fees total description for that invoice.
o Default description: Default text for the Fees total description on simple invoices—e.g. "Fees for Services Rendered".
● In the Options - Billing window, click
Header and Footer from the Invoices section.

● 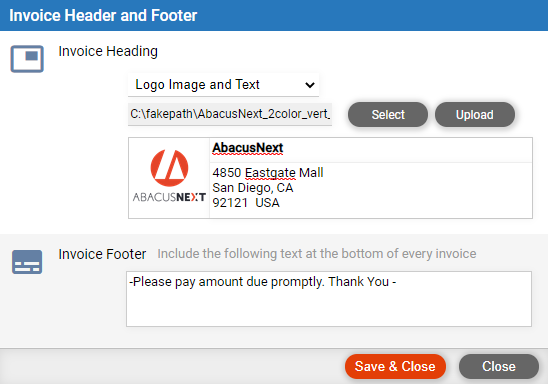
● Set the options for new invoices.
● Invoice heading: Show at the top of each invoice:
o Logo (about 6.5 x 1 inch) — choose centered, left-justified, or right-justified
o Logo (about 6.5 x 2 inches) — choose centered, left-justified, or right-justified
o Left-adjusted logo (about 1 x 1 inch), with text beside it (firm name and address)
o Centered
text only (firm name and address)
● TIP: If your uploaded logo is too large or small, it will be automatically resized to fit.
o Invoice footer: Show this text at the bottom of each invoice.
● In the Options - Billing window, click
Trust Accounts from the Bank Accounts
section.

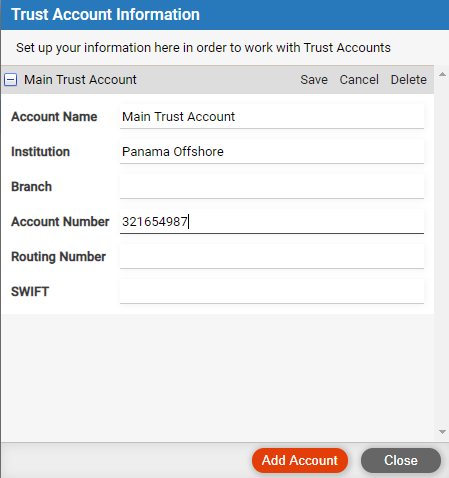
● Add, edit, and delete accounts as appropriate.
● You can use merchant processing with a trust account—see How to set up merchant processing.
This type of bank account information is needed only if your firm has set up merchant processing—see How to set up merchant processing.
● Choose Options > Billing, and click Operating
Account.

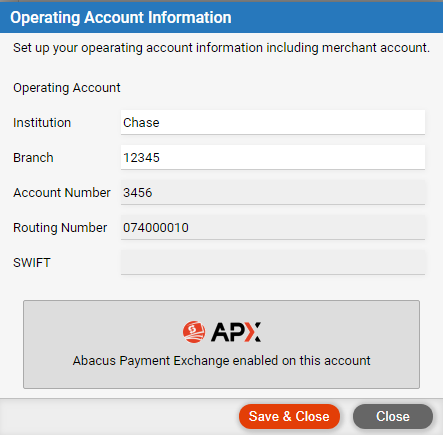
● Edit the account information as appropriate.
● See Customize expense features.
● Your Amicus administrator designates which firm members are billing supervisors, billing users, or non-billing users.
● Enable integrated billing for the firm
● Set retainer replenishment amounts on bills
● Manage bills and payments on a file (set billing options for a file)
Amicus Cloud (January 2023)
Copyright