Note: The following radio button must be enabled from within your browser:

Before using the QuickBooks Online Link on a day-to-day basis, you must first perform some configuration steps and a first exchange. The Amicus QuickBooks Online Link Wizard guides you through this process.
|
Note: The following radio button must be enabled from within your browser:
|
● STEP 1 Connect to QuickBooks Online
● STEP 2: Customer Preferences
● STEP 3: Transaction Preferences
Before running the link wizard you may want to add service items and general ledger accounts in QBO for these transactions if they do not already exist:
● Billed Fees
● Expenses
● Retainer
● Tax 1 and Tax 2
● Write Off, if you intend to credit a single service item for write offs
● And optionally add the following general ledger accounts for Trust:
o Trust Liability
o Trust Check (if you intend to print
check in QuickBooks Online.
1. Log into QuickBooks.
2. Click the Gear icon at top of the screen to display the following menu:
● Please refer
to your QuickBooks Online help for information on how to add service items
and general ledger accounts.
3. Map all Amicus accounts to QuickBooks General Ledger accounts.
|
Note: You can map multiple Amicus accounts to the same QuickBooks account if you wish. |
● Click on a
menu item to display a list. Click New and fill
out the corresponding form in QuickBooks. Click Save
and close to complete the process.
The basic Amicus accounts are General Bank, Fees Revenue, and Expense.
If you've set the Link to exchange trust transactions, then two Trust
Bank categories are listed for each Trust Bank Account defined in Amicus:
a Trust Checks account and a Trust Receipts account. If taxes are enabled
in any Amicus files, then a Tax 1 Liability account (and a Tax 2 Liability
account if necessary) will be listed.
Amicus Accounts |
QuickBooks Accounts (suggested) |
General Bank |
Undeposited Funds (Asset) account. TIP: We recommend subsequently depositing funds to the appropriate General Bank account in QuickBooks. |
Fee |
Legal Fee Revenue account. |
Expense |
Typically, an Expense or Asset account. |
[Trust Bank Accounts] Trust Bank Accounts (as specified in your Options > Billing > Trust Accounts list), and only if you've configured the Link to exchange Trust transactions. For each Trust Bank Account specified in Amicus, two are provided for mapping: a Trust Check account and a Trust Receipt account. |
If you wish to use the Undeposited Funds (Asset) account, you should map Trust Checks and Trust Receipts to different QuickBooks accounts. TIP: If you wish to use a single account for both Trust Checks and Trust Receipts, consider mapping both Amicus accounts to a QuickBooks clearing (exchange) account. This enables a QuickBooks user to print checks and receipts against this clearing account, upon which the funds would be transferred as appropriate. |
Trust Liability Account GL Client Funds in Trust Only shown if you've configured the Link to exchange Trust transactions. |
Trust Liability Account |
Tax 1 Account GL |
A clearing (exchange) Liability account. |
Tax 2 Account GL Only if Tax 2 is applied by the firm for one or more non-closed, billable files. |
A clearing (exchange) Liability account. |
I. Character fields cannot be longer than 21 characters
1. Choose Options > QuickBooks Link to display the QuickBooks Link Wizard Initialization window:
● Select the
Enable Amicus Cloud Integration with checkbox
to enable the QuickBooks Online option
2. Click the
Go to QuickBooks Link Wizard Initialization
bar to display the Go to QuickBooks Overview
wizard:
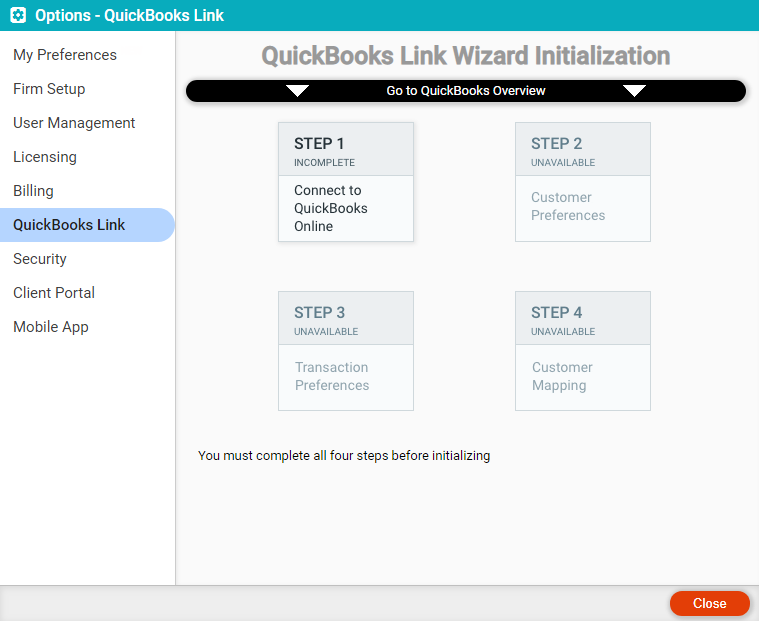
● Click the STEP buttons to start, resume, or redo the steps.
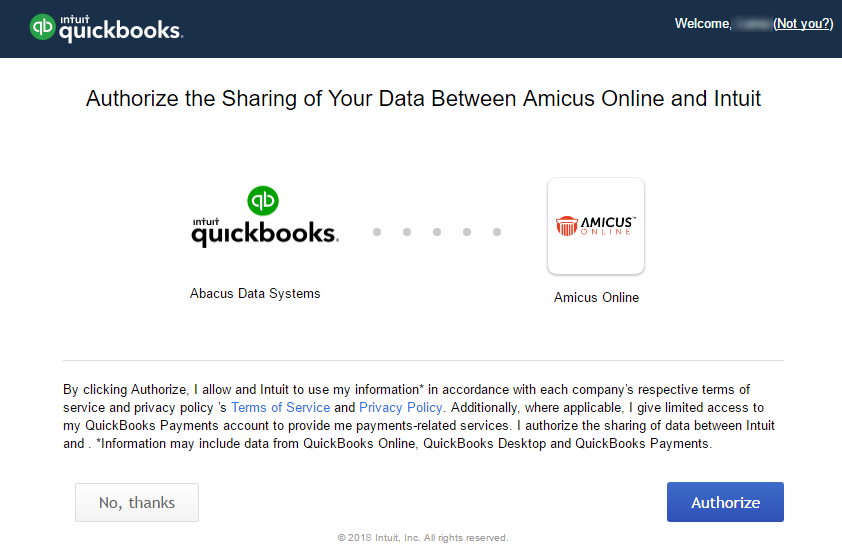
1. On the first
window that appears for STEP 1, click the Connect to QuickBooks button.
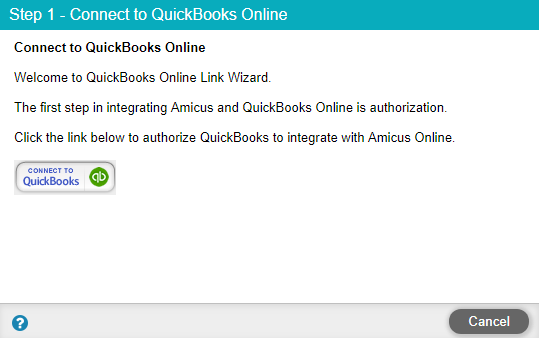
2. The following
window appears:
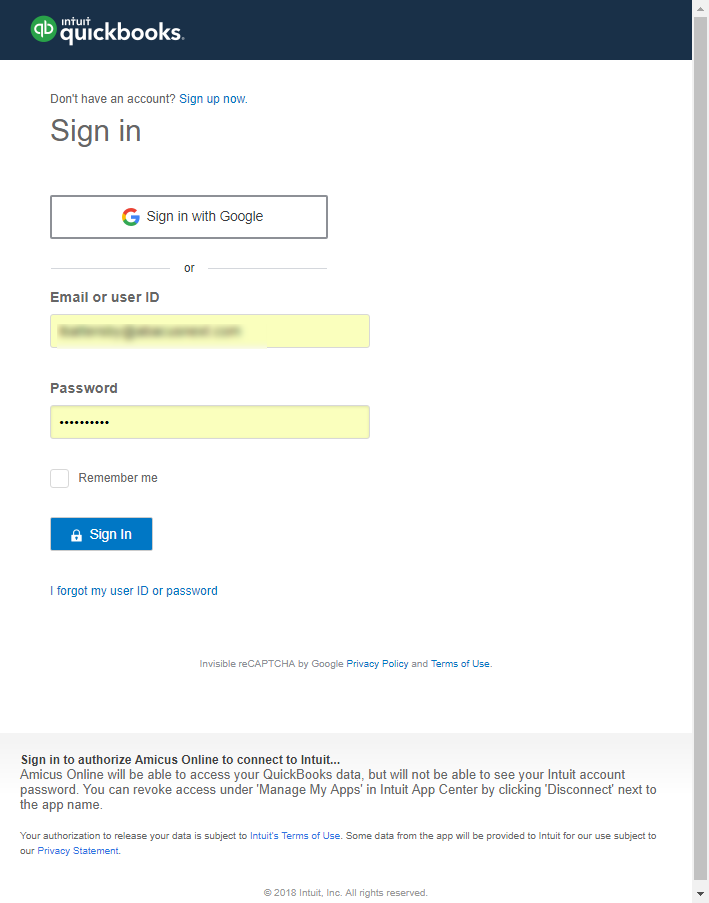
● Enter your
Intuit ID and Password
and click the Sign In button.
NOTE: You might not see this window if you are
already signed in to QuickBooks Online.
3. On the
next window that appears, click the Authorize
button to establish a connection.
4. You are returned
to the QuickBooks Link Wizard Initialization
screen. The message complete appears under STEP 1. You are ready to go to the next step in
the wizard.
Note: After connecting to QuickBooks
Online you can use this step (STEP 1) to disconnect the QuickBooks Online
Link.
|
Note: Conflicts are resolved based on the Link priority options set by Amicus Administrator. |
1. In the window
that appears for STEP 2, select which database
has more accurate client data (Amicus Cloud or QuickBooks Online) from
the dropdown menu to determine which program’s records will overwrite
the other in cases where matching records exist in both programs. This
affects initialization but not subsequent exchanges.
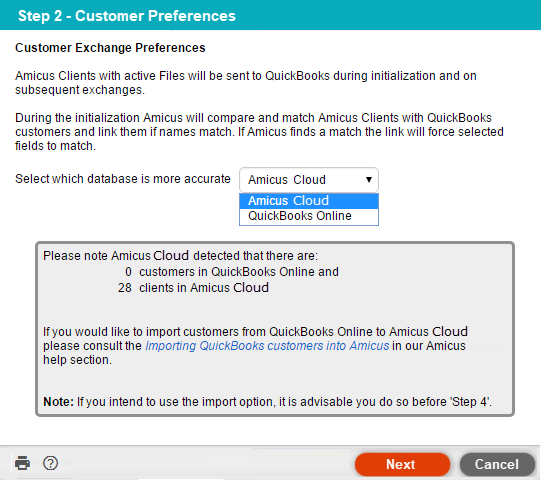
2. Click the Save & Close button and you are ready to go to the next step in the wizard.
1. On the first
window that appears for STEP 3, choose a posting start
date from the Calendar control field for Amicus Invoice,
Payment, Write off/Credit
Memo, and (optionally) Trust transactions
to be exchanged to QuickBooks Online.
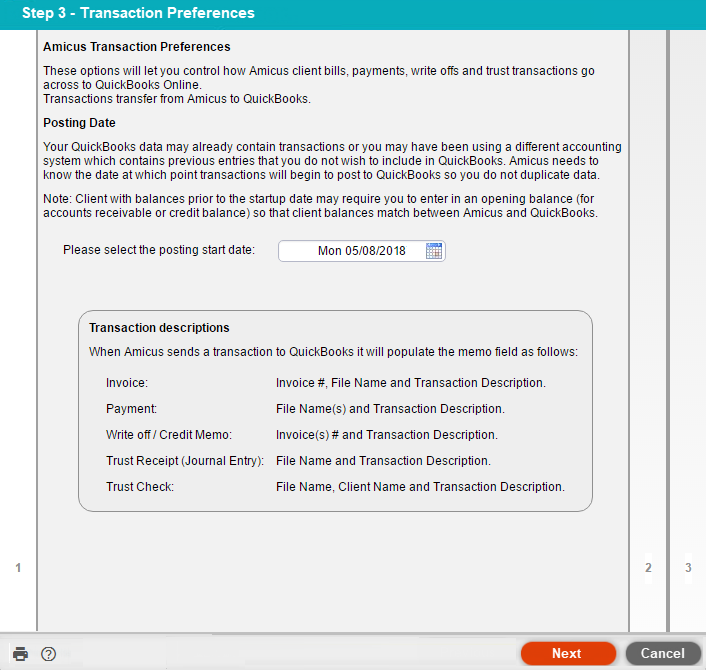
● Click the Next button.
2. The next
window appears. If you do not want to post trust transactions to QuickBooks
Online, no changes need to be made to this window and you can click the
Next button. If you do want to post trust transactions
to QuickBooks Online, check the Post Trust transactions
to QuickBooks option, complete the remaining fields by selecting
items from the dropdown menus. Click the Next
button.
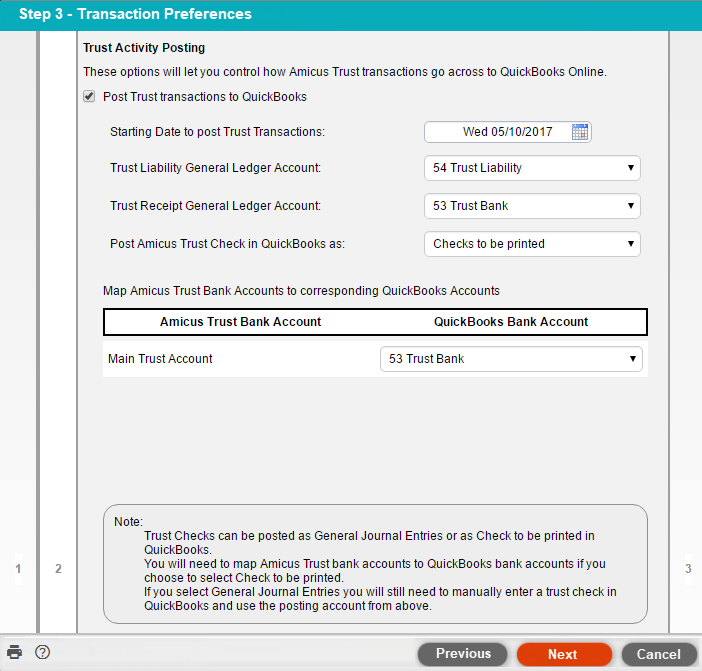
● Starting Date to post Trust Transactions: Only trust transactions for this date or later will be transferred to QuickBooks Online.
● Trust
Liability General Ledger Account: The General Ledger account (typically
a liability account with a credit balance) that holds the trust liability
balance.
NOTE: Changing this account after the QuickBooks
Online link has been established will not retroactively change entries
already posted.
● Post
Amicus Trust Check in QuickBooks as: Select either Checks
to be printed or General Journal Entry.
Selecting Checks to be printed displays all Amicus
Trust Bank Accounts where you can map Amicus Trust bank accounts to QuickBooks
Online bank accounts.
Selecting General Journal Entry displays the
QuickBooks Online chart of accounts. Selected trust checks create a general
journal entry with a debit against the QuickBooks Trust liability General
Ledger account and a credit to the selected General Ledger account. When
this option is selected, then you need to create a check manually in QuickBooks
Online and choose the selected General Ledger account.
3. On the next window, you can choose how items on bills are handled.
|
Note:
Write-offs are only handled for US QuickBooks Online customers. |
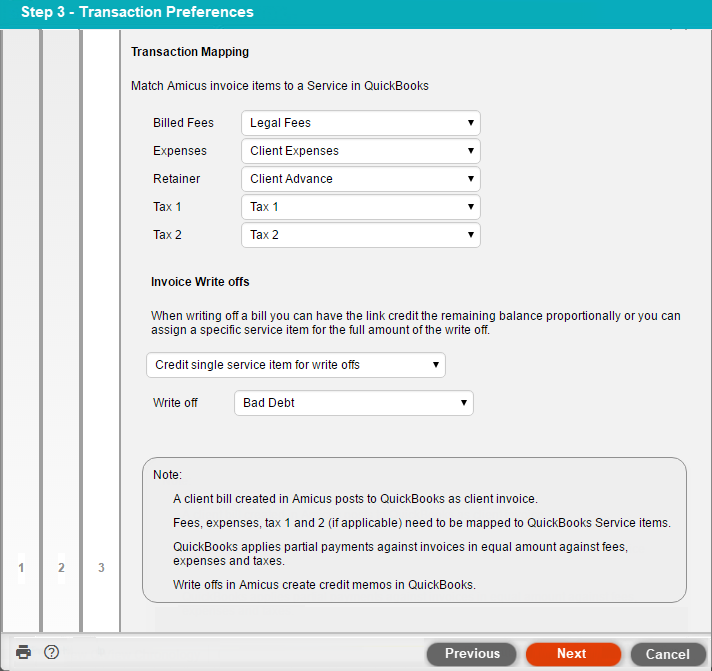
Transaction Mapping
Match Amicus Invoice items to a Service in QuickBooks
● Billed
Fees: Bills created in Amicus may have many fees and time entries.
When bills are posted in QuickBooks Online, Amicus invoices list one service
item for the combined total of the fees/time entries (net of discounts
or adjustments). The Billed Fees option lets you choose the single service
item to be used on invoices for fees/time entries.
NOTE: Each service item in QuickBooks Online
must be associated with a General Ledger account (typically an income
account). This ensures that when a client pays a bill that the proper
account is credited.
● Expenses: Bills created in Amicus may have many expenses. When bills are posted in QuickBooks Online, Amicus invoices list one service item for the combined total of the expenses. The Expenses option lets you choose the single service item to be used on invoices for expenses.
● Retainer: If a client makes an advance payment prior to being invoiced or makes an overpayment on a bill and it is deposited to the general bank account, then this is considered a retainer. The Retainer option lets you choose the QuickBooks service item for retainer.
● Tax 1, Tax 2: When bills are posted in QuickBooks Online, taxes appear as service line items on the bill. The Tax options let you choose the service items to be used on invoices for taxes.
Invoice Write offs:
● A write off
in Amicus creates a credit memo in QuickBooks Online to be applied to
the customer’s outstanding invoices.
For this option you can select Credit single service
item or Credit remaining outstanding items proportionally.
o If you select Credit single service item, a drop-down list appears where you can select a service item. When bills are written off, this service item is used to create a single line item for the amount of fees and expenses that are being written off (net of taxes).
o If you
select Credit remaining outstanding items proportionally,
the amount of the write off for fees and expenses (net of taxes) is determined
in proportion of the amount of fees and expenses on the original invoice.
Canadian QuickBooks Online Users
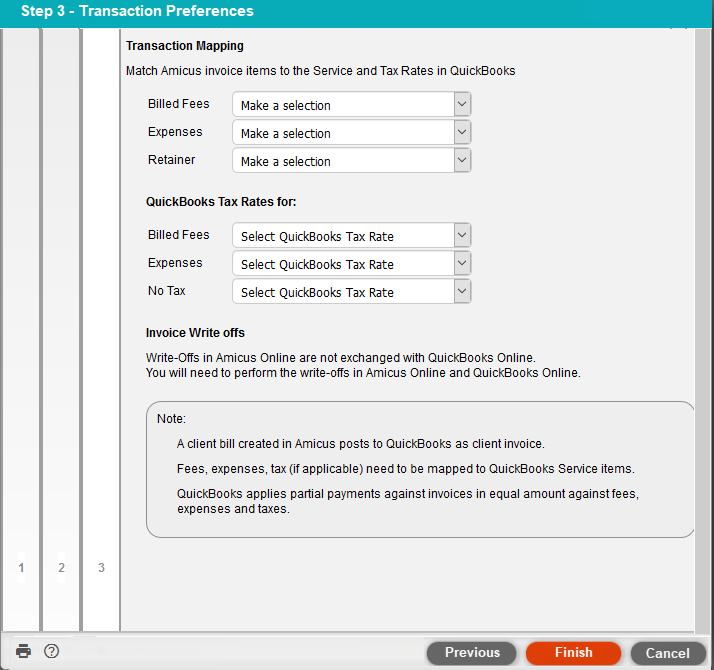
Transaction Mapping
Match Amicus invoice items to a Service and Tax in QuickBooks
● Billed
Fees: Bills created in Amicus may have many fees and time entries.
When bills are posted in QuickBooks Online, Amicus invoices list one service
item for the combined total of the fees/time entries (net of discounts
or adjustments). The Billed Fees option lets you choose the single service
item to be used on invoices for fees/time entries.
NOTE: Each service item in QuickBooks Online
must be associated with a General Ledger account (typically an income
account). This ensures that when a client pays a bill that the proper
account is credited.
● Expenses: Bills created in Amicus may have many expenses. When bills are posted in QuickBooks Online, Amicus invoices list one service item for the combined total of the expenses. The Expenses option lets you choose the single service item to be used on invoices for expenses.
● Retainer: If a client makes an advance payment prior to being invoiced or makes an overpayment on a bill and it is deposited to the general bank account, then this is considered a retainer. The Retainer option lets you choose the QuickBooks service item for retainer.
QuickBooks Tax Rates for:
Optionally, select a Tax Rate created in QuickBooks
Online from the dropdown list in the appropriate field.
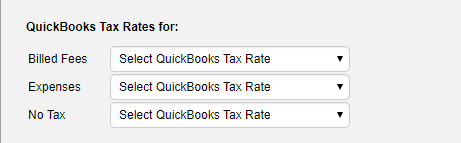
o The dropdown lists default to "Select QuickBooks Tax Rate".
Invoice Write offs
● Write-offs in Amicus Cloud are not exchanged with QuickBooks Online. The write-offs must be performed in both applications.
4. Click the Finish button and you are ready to go to the next step in the wizard.
The Customer Mapping window lets you map Amicus Clients to QuickBooks Online customers.
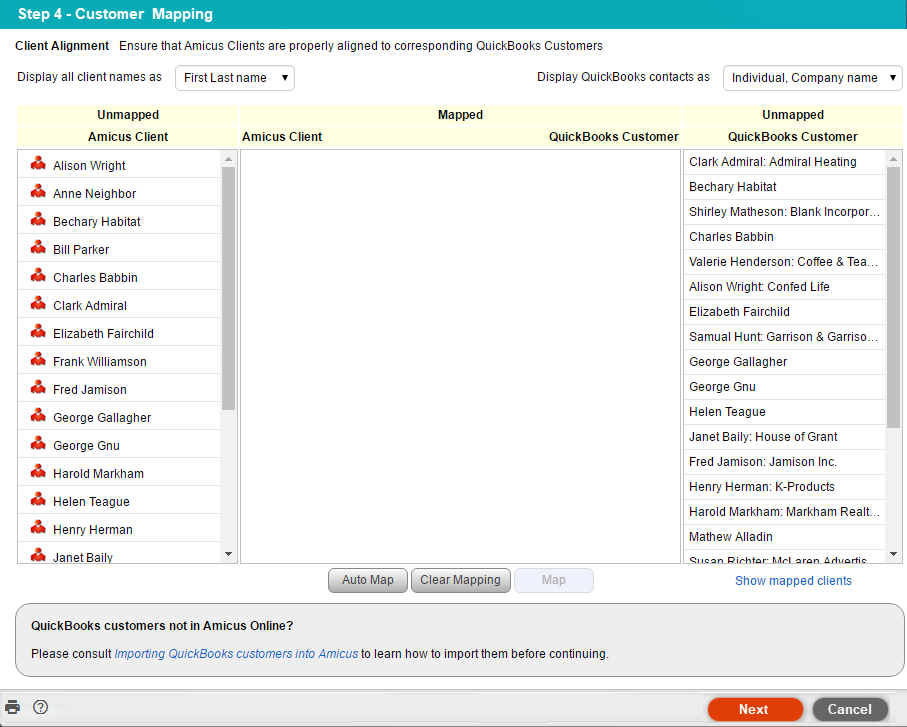
1. Click the Auto Map button. The system maps the unmapped records where it is possible. The names must be exactly the same.
● Clients/Customer records in:
o Grey have been matched and mapped.
o Bold indicates that no match was found in QuickBooks Online.
o Red indicates
matching problems (for example, multiple corresponding matches in QuickBooks
Online).
● Hover over a Client/Customer record for more information about the conflict.
2. Map remaining unmapped records and conflicts manually. Highlight an unmapped record and then highlight a corresponding record and click the Map button (or Unmap button as appropriate).
3. Click the Save & Close button and you are ready to initialize the link.
1. Once the
four steps are completed, the Initialization Complete
option is active. Click this option.
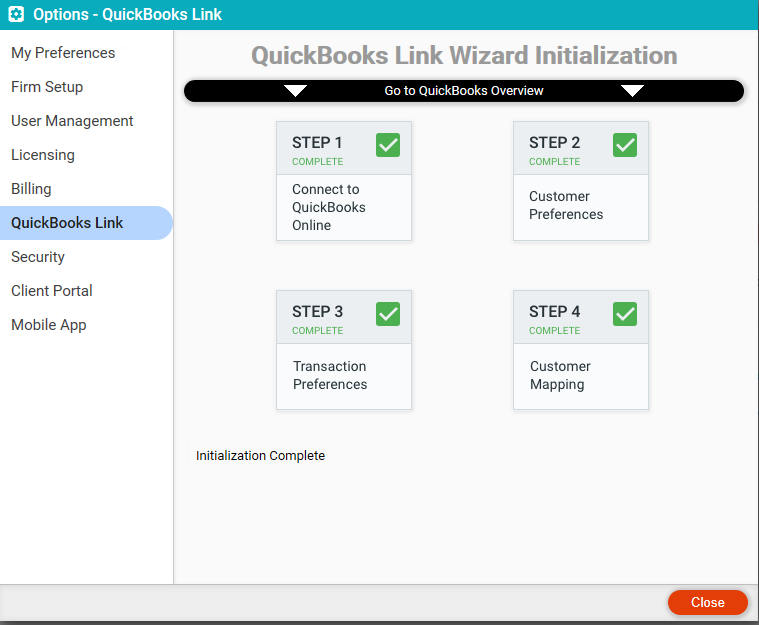
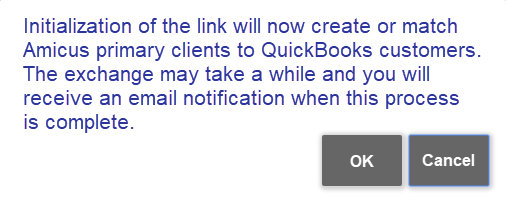
2. The following
message appears. Click OK to complete the initialization
process.
● The initialization process can take some time. You can continue your work in Amicus Cloud as you wish.
● To check your initialization status, click the Status button.
● When the initialization process is complete, a notification message appears in the window. If the process failed, a link providing the option to retry initialization appears.
● QuickBooks Online Link - What is it?
● QuickBooks OnlineLink - How to use it
● QuickBooks OnlineLink - What does it exchange?
● Importing QuickBooks customers into Amicus
Amicus Cloud (January 2023)
Copyright